Do you need to get a phone number, name, or email from the contact list on your phone in Flutter? If yes, it is a very easy way to implement this functionality in your Flutter project. Sometimes you need this kind of functionality for a client project or personal project development. For that, you need to create a Flutter contact list. It covers everything you need to know, including how to access phone contacts and display them in a list view.

Table of Contents
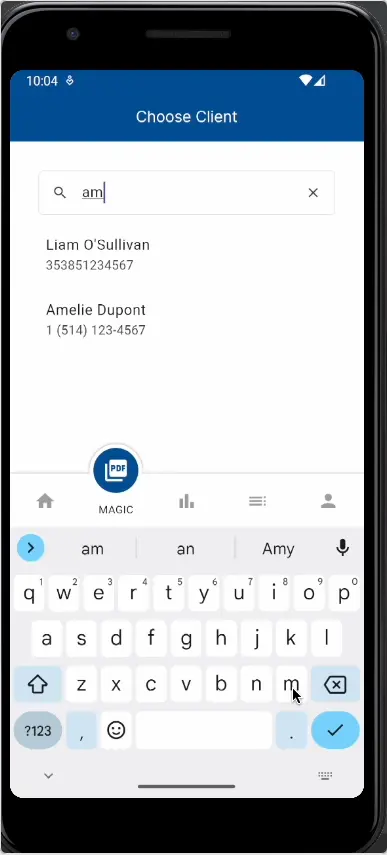
Flutter is a popular framework for building mobile apps, and reading and writing contacts is a common feature in many applications. In this article, we will see flutter_contacts packages for that. You can use other fast_contacts and contacts_service packages to create a Flutter contact list, access phone contacts, and display them in a list view. We will see a Flutter contacts example using the search box.
What is a Flutter Contact List?
A Flutter contact list is a feature that allows you to access and display the contacts stored on a user’s phone. This is useful for apps that require user interaction with their contacts, such as messaging or social networking apps. For example, if you’re working on a project related to reading OTPs from SMS Flutter, having a contact list can make it easier to manage who you’re sending messages to or receiving OTPs from. It integrates smoothly with other Flutter features to enhance the app’s functionality.
Let’s start to get a contact list from your phone in Flutter
Step 1: Create a new Project or open an existing one
- Open Android Studio.
- Click on New Flutter Project.
- Make sure you have selected your Flutter SDK Path. Click Next
- Enter the Project Name, Project Location (where you need to put the project),
- Select the project type (Default Application).
- Enter Organization
- Select Android and iOS languages (default: Kotlin and Swift).
- Select Platforms (On which platform you want to run the project).
- Click on Finish button.
- Now wait for the project to finish building.
Step 2: Adding the flutter_contacts Package in the pubspec.yaml
- Open the pubspec.yaml file from the left panel of the project directory.
- Add the flutter_contacts package under dependencies.
- Add the permission_handler package under dependencies.
dependencies:
flutter_contacts: ^1.1.8
#fast_contacts: ^3.1.3
#contacts_service: ^0.6.3
permission_handler: ^11.3.1- Click on Pub get to retrieve packages in the project.
Step 3: Modify AndroidManifest.xml (for Android)
- Add the READ_CONTACTS and WRITE_CONTACTS permission to the Android Manifest file. Go to android/app/src/main/AndroidManifest.xml
- Add READ_CONTACTS and WRITE_CONTACTS permission before <application> tag.
<uses-permission android:name="android.permission.READ_CONTACTS" />
<uses-permission android:name="android.permission.WRITE_CONTACTS" />
Step 4: Add the following to your app’s info.plist for iOS build
<plist version="1.0">
<dict>
    ...
    <key>NSContactsUsageDescription</key>
    <string>we need access to the contact list</string>
</dict>
</plist>
Step 5: Import the Package
In your Dart file, import the flutter_contacts and permission_handler package.
import 'package:flutter_contacts/flutter_contacts.dart';
// import 'package:fast_contacts/fast_contacts.dart'; // Uncomment this line when you use the fast_contacts package.
import 'package:permission_handler/permission_handler.dart';
Step 6: Ask a user permission to access the contact list from the phone
@override
void initState() {
      super.initState();
      _askPermissions();
}
Future<void> _askPermissions() async {
PermissionStatus permissionStatus = await _getContactPermission();
print("$permissionStatus");
if (permissionStatus == PermissionStatus.granted) {
getAllContacts();
} else {
_handleInvalidPermissions(permissionStatus);
}
}Future<PermissionStatus> _getContactPermission() async {
PermissionStatus permission = await Permission.contacts.status;
if (permission != PermissionStatus.granted &&
permission != PermissionStatus.permanentlyDenied) {
PermissionStatus permissionStatus = await Permission.contacts.request();
return permissionStatus;
} else {
return permission;
}
}void _handleInvalidPermissions(PermissionStatus permissionStatus) {
if (permissionStatus == PermissionStatus.denied) {
final snackBar = SnackBar(content: Text('Access to contact data denied'));
ScaffoldMessenger.of(context).showSnackBar(snackBar);
} else if (permissionStatus == PermissionStatus.permanentlyDenied) {
final snackBar = SnackBar(content: Text('Contact data not available on device'));
ScaffoldMessenger.of(context).showSnackBar(snackBar);
}
}void getAllContacts() async {
// Get all contacts on device // read contact list
List<Contact> contacts = await FlutterContacts.getContacts();
// List<Contact> contacts = await FastContacts.getAllContacts(); // Uncomment this line when you use the fast_contacts package.
for (var contact in contacts) {
// Implement logic to get name, phone, and email using below(access contacts):
// Get Name
print(contact.displayName);
// Get Phones
print(contact.phones.isNotEmpty ? contact.phones[0].number : "");
// Get Emails
print(contact.emails.isNotEmpty ? contact.emails[0].address : "");
}
}Step 7: Write contact into the phone contact list
// Insert new contact (write contacts)
final newContact = Contact()
..name.first = firstNameController.text // Get text from your first name controller
..name.last = lastNameController.text // Get text from your last name controller
..phones = [
Phone(
"$selectedCountryCode${mobileController.text}") // Added with country code here.
]
..emails = [Email(emailController.text)]; // Get text from your email controller
await FlutterContacts.insertContact(newContact);

Conclusion
Rather than using the flutter_contacts package, if you want to get a quick contact list, then I will suggest you use the fast_contacts package. Using the above steps, you can get a phone number, name, or email from the contact list on your phone, and you can also create or add a new contact list in your Flutter project. There are so many ways you can bind the data to display your contact list. Here, we explain a very simple way to understand the flow of the Flutter contact list. We explain using the flutter_contacts and fast_contacts packages. You can also implement it using the contacts_service package.
Frequently Asked Questions(FAQs)
How to make a contact list in Flutter?
You can make a contact list using the flutter_contacts, fast_contacts, and contacts_service packages.
How do I get flutter to read contacts permission?
To read a contact permission, you need to add the below code in your AndroidManifest.xml file.
<uses-permission android:name=”android.permission.READ_CONTACTS” />
If you want to create or add contact in your phone, then you also need to add below permission.
<uses-permission android:name=”android.permission.WRITE_CONTACTS” />
How do I get contact details in Flutter?
There are so many packages available to get contact details from mobile phones in Flutter. We will explain a step-by-step guide to getting a contact list from your phone.
How do I create a contact list in Flutter?
To create a contact list, you need to implement the flutter_contacts package in your YAML file. You need to add permission in the AndroidManifest.xml file to read and write contact lists from your phone. You can use the below code to add a new contact.
final newContact = Contact()
..name.first = “Jignesh”
..name.last = “Patel”
..phones = [
Phone(
“+91 99XXXXXXXX”)
]
..emails = [Email(“info@fluttertutorialhub.com”)];
await FlutterContacts.insertContact(newContact);
How do I check contact permission in Flutter?
You need to use the permission_handler package in your Flutter project. To ask permission using the getContactPermission method. Once you get the permission using this, you can find the status of permission using below:
// In pubspec.yaml file
permission_handler: ^11.3.1
// In your dart file
import ‘package:permission_handler/permission_handler.dart’;
PermissionStatus permissionStatus = await _getContactPermission();
print(“$permissionStatus”);
if (permissionStatus == PermissionStatus.granted) {
// Implement functionality once permission granted
} else {
// handle invalid permission
}
Future<PermissionStatus> _getContactPermission() async {
          PermissionStatus permission = await Permission.contacts.status;
          if (permission != PermissionStatus.granted &&
               permission != PermissionStatus.permanentlyDenied) {
                         PermissionStatus permissionStatus = await Permission.contacts.request();
                         return permissionStatus;
           } else {
                         return permission;
           }
}

I’m a Flutter and iOS developer, entrepreneur, and owner of fluttertutorialhub.com. I live in India, and I love to write tutorials and tips that can help other developers. I am a big fan of Flutter, FlutterFlow, iOS, Android, mobile application development, and dart programming languages from the early stages. I believe in hard work and consistency.
